
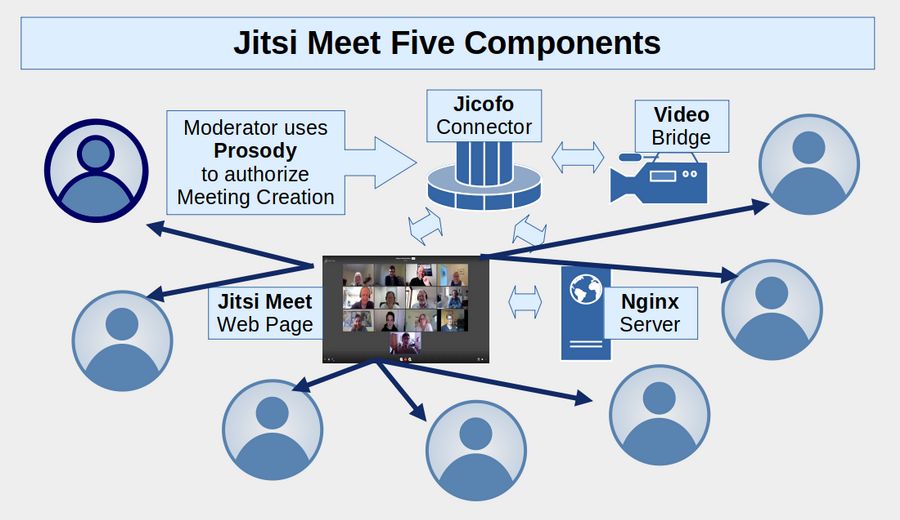
It will be easier to understand how to install Jitsi Meet if you have some idea of its five basic components. These include the Jitsi Meet web page interface as output for an Nginx server combined with a Prosody Authorization system, a Video Bridge video transmission tool – and all connected together by a system called Jicofo.
Components of a Secure Virtual Private Server (VPS)
Before we can build our Jitsi Meet video conference system, we first need to create a secure Linux Virtual Private Server. This server should not be located in the US due to the Draconian Patriot Act. We will therefore use a more secure option called CanHost.ca which is located in Canada. CanHost also provides an easy to use Domain Name (DNS) management system which will help us set up Security Certificates required by Jitsi. Finally, CanHost allows us to choose either the Linux Debian 11 or Debian 12 operating system when we create our server.
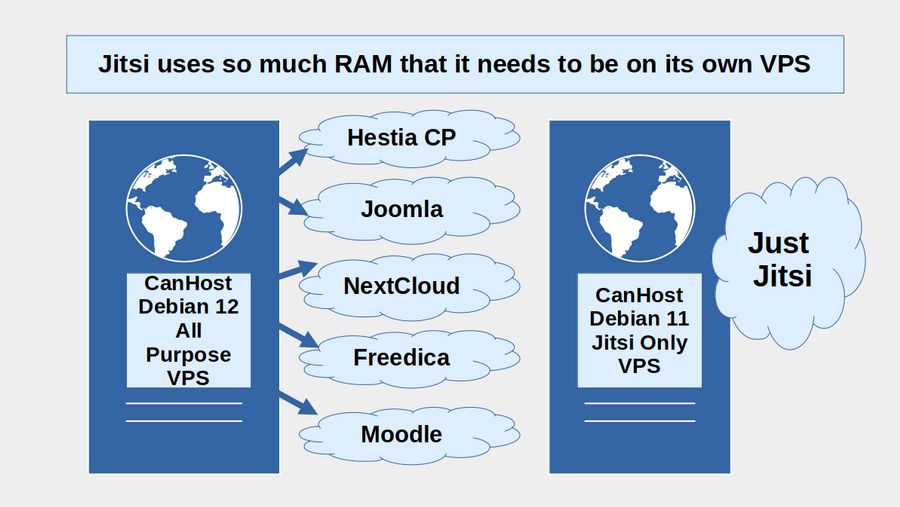
In previous articles, we have explained how to use CanHost to set up a Linux Debian 12 Server which can be controlled from a secure Graphical Interface called the Hestia Control Panel. We then used this server to set up a series of interconnected Joomla websites (as a more secure alternative to Wordpress), Nextcloud Team Networks (as a more secure alternative to Google Docs and Google Forms), Freedica Social Networks (as a more secure alternative to Facebook and or Twitter) and Moodle websites that can be used for offering secure online courses.
Unfortunately, we should not install Jitsi on our “all purpose” server because the Hestia Control Panel as well as the social network and everything else running on that VPS all use significant amounts of RAM. Because Jitsi is streaming not just one but 20 to 40 videos all at the same time, Jitsi really needs its own source of RAM.
Ideally, each attendee should have a High Speed Internet connection, preferably directly connected to the Internet with a wired Ethernet cable attached to their Home router. But so our VPS does not become a data transfer bottleneck, we will use CanHost to set up a special VPS assigned to only our Jitsi Video Conferencing system. In addition, because Jitsi uses an older version of JAVA, which is not offered by the Debian 12 operating system, we will use the Debian 11 operating system for our Jitsi VPS. Finally, because we will not be using the Hestia Control Panel to visually control our server, we will review how to install and use the Midnight Commander File Manager to visually see and edit our Jitsi files.
Step 1 Initial steps before installing Jitsi
#1.1 Begin by getting a secure Linux laptop, a process we described in several previous articles. Do not use a Windows or Apple laptop as neither of these are secure. Also get a secure email address to associate with your CanHost account. Do not use Gmail as that would defeat the whole purpose of setting up a SECURE video conference system. It is very easy to get a free secure email address at Protonmail.com.
Then use your secure Protonmail email address and your Linux Laptop to get a CanHost account (if you have followed our previous articles, you already have one). Otherwise, go to CanHost.ca and sign up.
#1.2 Use CanHost to get a Domain Name for our Jitsi VPS
You can transfer an existing domain name to CanHost but the process will take a couple of weeks. In this article, we will use the domain name peacenetwork.us. We will use a sub-domain name called ns1.peacenetwork.us to install our VPS and another sub-domain name called meet.peacenetwork.us to install Jitsi. We can also use the primary domain name peacenetwork.us to install a Joomla website as our main website onto our other VPS simply by assigning it to the IP address associated with our other VPS. We can also use the sub domain team.peacenetwork.us to install a NextCloud network and a series of sub domains such as washington.peacenetwork.us to create a series of state chapter websites when building a national movement.
#1.3 Order your CanHost Debian 11 VPS
Go to this web page and click VPS Express 2. It is $25 Canadian which converts to $18 US: https://www.canhost.ca/vps-hosting/
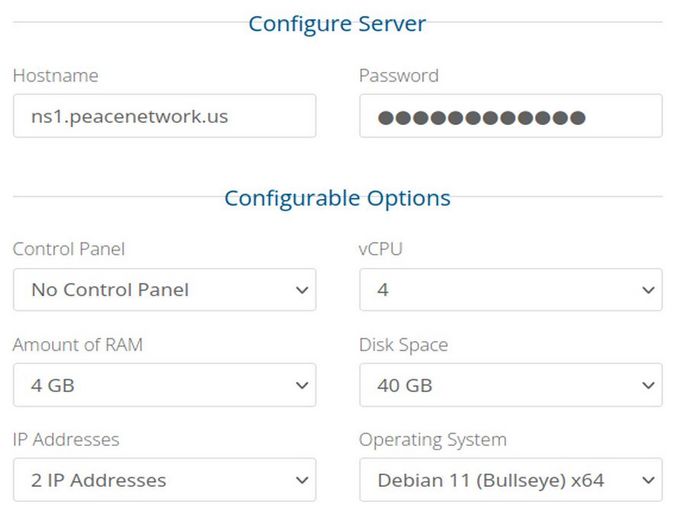
For Hostname, type your CanHost domain name preceded by the sub domain ns1. Then enter a secure password which you will need later.
Change the Operating System to Debian 11. Then enter your System Username in lower case letters with no spaces in Additional Information. Then click Continue to pay for the first month charge for your new VPS. In about an hour, your will receive an email at your Protonmail address letting you know the server is active and what the Primary IP address of your VPS is.
#1.4 Use the CanHost DNS Manager to set up your DNS Records
Log into your CanHost account and click Client Area, Domains. To the right of your Domain Name is a small wrench and an arrow. Click on the arrow and click Manage Name Servers. Then in the left side menu, click Manage DNS. Replace the CanHost IP addresses with your own primary IP address. Then scroll to the bottom of the table and click Save Changes.
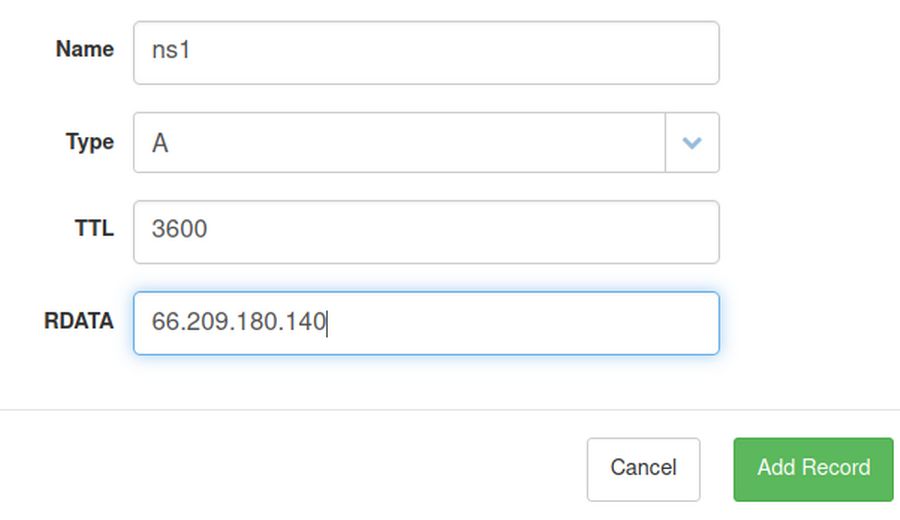
Next, click Add Record. Change the Type to A. Then for name, type ns1. For RDATA, type your IP address. Then click Add Record:
Click Add Record again to create an A record for the sub domain meet. Click Add Record again to create an CAA record for your domain name so that we can get a Security Certificate for it. For Name, type your domain name. For RDATA, type the number 0. For next box, type the word issue and for the lowest box, type letsencrypt.org. Then click Add Record:
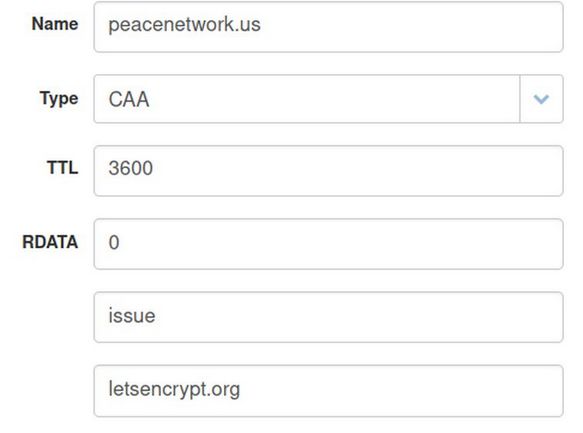
Click Add Record again to create an CAA record for all sub domains associated with your primary domain name so we can get . The only difference between the second CAA record and the first one is that instead of typing the word issue, you should type the word issuewild (with no spaces). Then scroll to the bottom of the table and click Save Changes. Then log out of your CanHost account.
Step 2 SSH into your VPS from your home computer terminal
We next need to start an SSH session to create a root user which we need in order to install our Jitsi Network. Open a terminal on your home computer. Use the Primary IP address given to you by Canhost in their email to SSH into your new server from our home computer terminal with this command:
ssh yourusername@yourIPaddress>
Example: ssh
Press Enter. Then type yes to accept the SSH connection. Then enter your VPS password and press Enter. Your terminal screen should then display the line that looks like: david@ns1>.
This means you are logged into your VPS and can begin to edit its settings.
Step 4: Create a Root User and Password
We need to create a Root User in order to install Jitsi. However, we need to change the SSH configuration file before we can create a root user. Once logged into your user SSH session, copy paste:
sudo nano /etc/ssh/sshd_config
This will open the ssh configuration file. Use the down arrow to scroll down to PermitRootLogin. Delete the hash at the beginning of the line PermitRootLogin and set the value to yes:
PermitRootLogin yes
Save this file by pressing the Control key and the lower case o key at the same time, followed by pressing the Enter key. Close the file by pressing Control plus the x key at the same time. To make the new setting take effect, restart the ssh service:
sudo systemctl restart sshd.service
While VPS is running, and still in your user ssh session, copy paste the following into the ssh terminal: sudo passwd root
Enter your sudo user password. Then add a root password typing it twice. Reply should be: passwd: password updated successfully
Log out of the user SSH with exit. Then close the home terminal.
Step 5 SSH into your VPS as the root user
SSH into your VPS from your home computer terminal with this command: ssh root@yourIPaddress>
For example, ssh
When prompted for the password, use the root password you just created. Once logged in as the root user, install the Midnight Commander graphical file manager with this command:
apt install mc
Midnight Commander is a graphical file manager that makes it easier to edit and move files in our VPS. We will use Midnight Commander to change some settings after we install Hestia.
Step 6 Install Jitsi Dependencies
There are three ways to install Jitsi. One option is to use a Package Manager called Docker. The problem with this option is that it adds an extra layer of complexity on top of an already complex process. Another option is the Manual Install method where every tool is installed separately. While this method is more transparent than the Docker option, there can be difficulty in configuring the settings on all of the tools to get them to work together. We will therefore use the Option in the middle which is called Debian/Ubuntu server installation option. It is also called the Jitsi Quick Start Install option. Here is a link to the official instructions:
https://jitsi.github.io/handbook/docs/devops-guide/devops-guide-quickstart
First, with the terminal SSH root session is still open, update the server with: apt update
Then install the required dependencies with the following command:
apt install wget curl gnupg2 apt-transport-https -y
Jitsi required Java OpenJDK version 1.11; the default Debian 11 repository provides Java OpenJDK 1.11. So copy paste the following command to install Java OpenJDK packages.
apt install default-jdk -y
After installation completes, verify the Java OpenJDK version using the command. java -version
If installing on Debian 11 VPS, you will see this: openjdk version "11.0.21" 2023-10-17 Sadly, this is what is required currently by Jitsi. Had we installed Debian 12 server, the default java version would be . openjdk version "17.0.9" 2023-10-17 which creates issues. Which is why for now, we will stick with Debian 11 which is supported until August 14 2026.
After all packages have been installed, move on to setting up Jitsi and Prosody repositories. Before installing Jitsi, you must add the Prosody and Jitsi repository to your system. To do so, run the following commands.
Step 7 Add Jitsi and Prosody Repositories
Jitsi components include Jitsi Videbridge, Jicofo, Jigasi, and Prosody. Before installing Jitsi, you must add the Prosody and Jitsi repository to your system. To do so, run the following commands. Add the Prosody repository and GPG key using the command below.
echo deb http://packages.prosody.im/debian $(lsb_release -sc) main | sudo tee -a /etc/apt/sources.list
wget https://prosody.im/files/prosody-debian-packages.key -O- | sudo apt-key add -
Then install lua
apt install lua5.2
Next, add the Jitsi MEET repository and GPG key using the following commands:
curl https://download.jitsi.org/jitsi-key.gpg.key | sudo sh -c 'gpg --dearmor > /usr/share/keyrings/jitsi-keyring.gpg'
echo 'deb [signed-by=/usr/share/keyrings/jitsi-keyring.gpg] https://download.jitsi.org stable/' | sudo tee /etc/apt/sources.list.d/jitsi-stable.list > /dev/null
Next, update your Debian repository using the command below.
apt update
Step 8 Setup UFW Firewall and Systemd Limits
For security reasons, running Jitsi with a UFW firewall is recommended. Also, to get better performance of Jitsi, you need to increase limits (max open files, max processes) on your Debian system. Run the following command to install UFW firewall packages.
It is likely that the UFW firewall is already installed. But this will help set up the proper links to install the latest version:
apt install ufw -y
After UFW installation, execute the 'ufw' command below one at a time to open some ports for Jitsi.
ufw allow 80/tcp
ufw allow 443/tcp
ufw allow 10000/udp
ufw allow 22/tcp
ufw allow 3478/udp
ufw allow 5349/tcp
ufw allow out 443/tcp
ufw allow out 443/udp
Now run the command below to start and enable the UFW service.
ufw enable
Type 'y' to confirm and press 'Enter' to enable, and you've activated the UFW firewall on your Debian system. To check the Firewall, copy paste:
ufw status verbose
06
To restart UFW, you will need to disable it first and then enable it again…. ufw disable then… ufw enable
Step 9 Set up limits
To set up limits of max open files, max processes, and max tasks, you need to edit the configuration '/etc/systemd/system.conf' using nano editor.
/etc/systemd/system.conf
For Java applications, it's recommended to set up max limits to '65000'. Use the down arrow to go to the end of the file. Copy and paste the end of the following configuration.
DefaultLimitNOFILE=65000
DefaultLimitNPROC=65000
DefaultTasksMax=65000
Save the changes with Control Plus o, then Enter. Then exit with control plus x. Next, close the SSH session with exit and close the terminal.
Step 10 Reboot server to enable changes
Use Canhost services to reboot your server. Then SSH to the server again as root and verify system limits configuration using the following commands.
systemctl show --property DefaultLimitNPROC
systemctl show --property DefaultLimitNOFILE
systemctl show --property DefaultTasksMax
Insure the value of 'DefaultLimitNPROC', 'DefaultLimitNOF, and 'DefaultTasksMax' is '65000'.
Step 11 Generate SSL Letsencrypt with Certbot
Install the certbot tool and generate SSL letsencrypt to secure Jitsi installation. Run the apt command below to install the certbot tool.
apt install certbot -y
Then generate SSL letsencrypt using the certbot command below. Make sure to change the email address and domain name.
meet.peacenetwork.us
certbot certonly --standalone --agree-tos --no-eff-email --email
certbot certonly --standalone --agree-tos --no-eff-email --email
if all processes are complete, you will see your SSL certificates on the directory '/etc/letsencrypt/live/jitsi.example.io/'. The Public certificate is 'fullchain.pem', and the Private key is 'privkey.pem'
Copy the full paths shown in the terminal:
Your certificate and chain have been saved at:
/etc/letsencrypt/live/meet.peacenetwork.us/fullchain.pem
Your key file has been saved at:
/etc/letsencrypt/live/meet.peacenetwork.us/privkey.pem
Step 12 Install Jitsi
Install Jitsi packages using the apt command below.
apt install jitsi-meet
Type 'y' to confirm the installation and press 'Enter' to continue. During the installation, you will be asked for some configurations below.
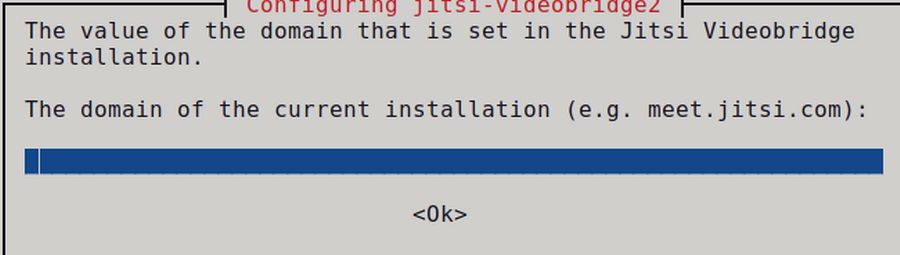
For the domain name, type your Jitsi domain installation and select 'Ok'. meet.peacenetwork.us
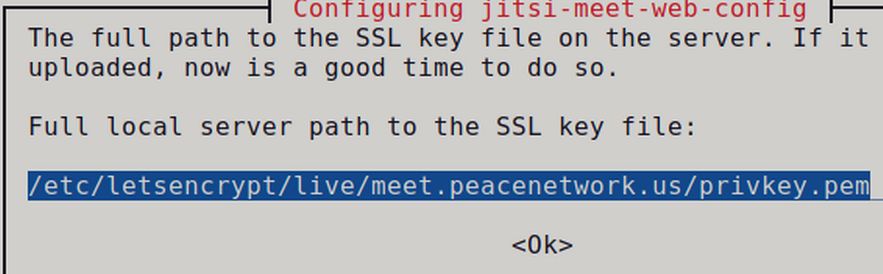
For SSL certificate configuration, use the down arrow to select 'I want to use my own certificate' and ok. Then copy paste the full path of your SSL private key 'privkey.pem' and select 'Ok Key is saved at: /etc/letsencrypt/live/meet.peacenetwork.us/privkey.pem
/etc/letsencrypt/live/meet.peacenetwork.us/privkey.pem
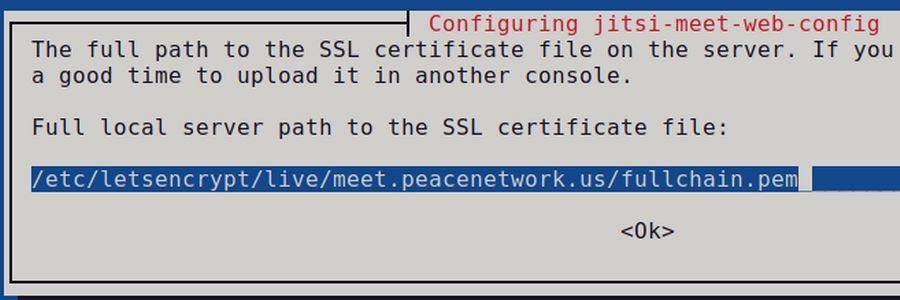
Next type the full path of the SSL certificate public key 'fullchain.pem' and select 'Ok' Certificate is saved at: /etc/letsencrypt/live/meet.peacenetwork.us/fullchain.pem
/etc/letsencrypt/live/meet.peacenetwork.us/fullchain.pem
The next popup asks if you want to add telephony to your Jitsi meetings. Leave it set for No and press Enter. Now you've completed the Jitsi Video Conference installation. Next, verify all Jitsi services using the following commands.
Verify the coturn service and make sure it's active and running.
systemctl status coturn
(Type lower case q to quit the popup).
Verify the jicofo and jitsi-videobridge services and ensure both are active and running.
systemctl status jicofo
systemctl status jitsi-videobridge2
Verify the prosody service and make sure it's active and running.
systemctl status prosody
Last, start and verify the Nginx service using the following command.
systemctl start nginx
systemctl status nginx
Then log out of your SSH session by typing exit, then Enter. Then close the terminal.
Step 13 Confirm that your Jitsi system is working
Launch a web browser and enter the hostname from the previous step into the address bar.
You should see a web page prompting you to create a new meeting.
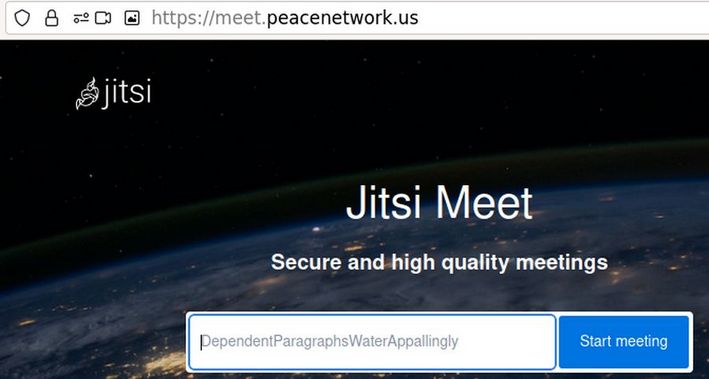
Make sure that you can successfully create a meeting and that other participants are able to join the session. If this all worked, then congratulations! You have an operational Jitsi conference service.
Step 14 Fix the second caller unable to join error
Very often, the second called will not be able to join the video conference. This error is typically caused by the Jitsi Video Bridge not connecting because the address discovery through STUN failed. SSH into your server and turn on Midnight Commander. Then go to var/log/jitsi and open the jicofo log file to see this error: Jitsi warning there are no operational bridges can not invite participant. No bridge available. Then open the jvb log file to see a this warning issued every 10 seconds: JVB Health check failed. Address discovery through STUN failed
Search on the Internet and you will see dozens of posts attempting to solve this problem. A likely cause of the problem is that a line in the file /etc/jitsi/videobridge/sip-communicator.properties is not set correctly. Go to this file and hash out this line:
#org.ice4j.ice.harvest.STUN_MAPPING_HARVESTER_ADDRESSES
Then scroll to the end of the file and add these two lines:
org.ice4j.ice.harvest.NAT_HARVESTER_LOCAL_ADDRESS=<Local.IP.Address>
org.ice4j.ice.harvest.NAT_HARVESTER_PUBLIC_ADDRESS=<Public.IP.Address>
Where the local IP is determined by going to:
https://whatismyipaddress.com/
and the public IP address is the primary IP address of your Jitsi server. Here are the two lines I copy pasted into sip-communicator.properties:
org.ice4j.ice.harvest.NAT_HARVESTER_LOCAL_ADDRESS=76.28.214.202
org.ice4j.ice.harvest.NAT_HARVESTER_PUBLIC_ADDRESS=66.209.180.140
Then restart Jicofo and Jitsi Video Bridge:
systemctl status jicofo
systemctl status jitsi-videobridge2
NOTE: Sometimes Jitsi Meet will not operate properly in p2p mode. You will know this if your Jitsi server disconnects repeatedly in meetings with exactly two people. To correct this, you can disable peer to peer mode. Edit the following file replacing “jitsi.site.com” with the subdomain of your Jitsi Meet instance:
/etc/jitsi/meet/jitsi.site.com-config.js
Use alt plus c to turn on lines. Scroll down to Line 92 and uncomment the “p2pTestMode” so it appears as follows:
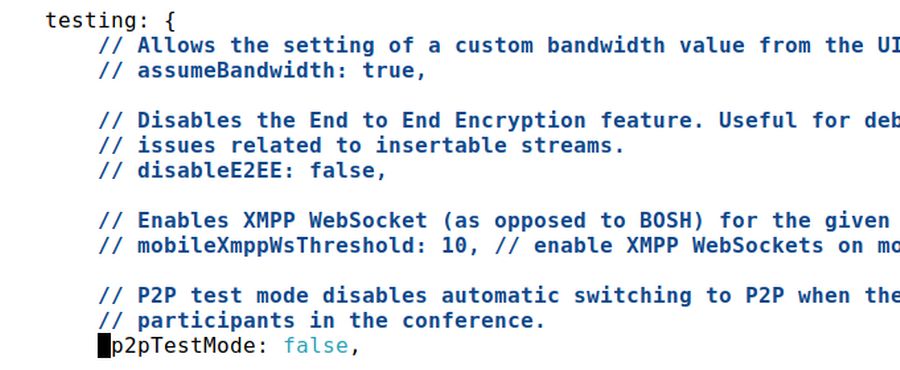
Save the file with CTRL O and Enter and exit the editor with CTRL X.
Troubleshooting Tips
If you encounter errors, check the error logs to find out what’s wrong.
/var/log/nginx/jitsi-meet.access
/var/log/nginx/jitsi-meet.error
/var/log/jitsi/jicofo.log
/var/log/jitsi/jvb.log
What’s Next?
In our next article, we will add an authorization system to limit who can create new video conferences to only authorized members.