6.1 Create a Home Page Slideshow

One of the most important modules for any website is the Home page slideshow. Like the Welcome article, it can introduce your readers who are more visually oriented with a summary of why they should spend time on your website. Here is what our Home Page will look like after creating this slideshow:

01

Note that the slideshow module is below the Menu module and above the Home Page Welcome article. Each of 14 slides displays for about 9 seconds. Therefore, it takes about 2 to 3 minutes to watch the entire slideshow. Those who are more visually oriented might just watch the slideshow. Those who prefer reading can read the Welcome article. Either way, your website visitors will better understand what your website is about and why they should spend more time visiting the various web pages on your website.

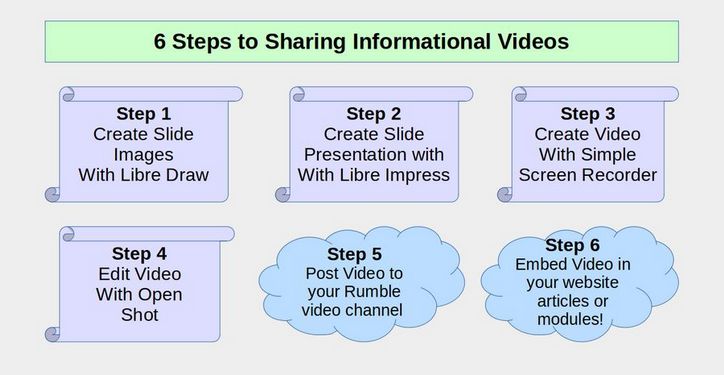
Create Slideshow Images
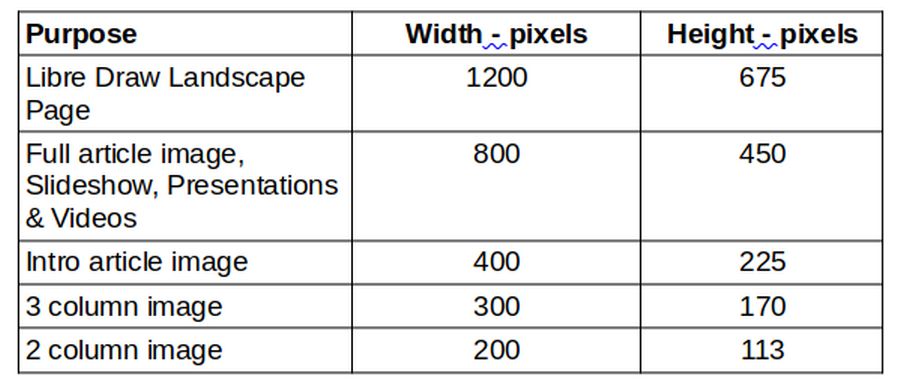
We will begin by creating our slideshow images – many of which can be taken from your Home page welcome article. We have previously created several featured images for various articles. These are 1200 pixels wide by 800 pixels high and compressed these to 150 DPI. We will use these and create a few more. However, because we want to use our slideshow images to create videos for our business video channel, we will change the ratio to 16 by 9 and therefore change the images to 1200 by 675. We will then resize these images to 800 x 450 to use for our slideshow – and we will resize these further to create images 400 pixels wide, 300 pixels wide and 200 pixels wide to use for our Intro article image, 3 column image and 2 column (side by side) image. Here is a table summarizing these image sizes – all of which are 16 by 9 ratio.

02

Create Slide Images with Libre Draw
Before we can post our network promotional video, we first need to make the video. And before we make our video, we need to create the visual images that will form the content of the video. A simple effective way to create slide images for your video is to use a free tool in Libre Office called Libre Draw. Libre Office is completely free and is included with Linux Debian. To create a new Drawing, open Libre Writer and click File, New, Drawing. This will bring up a slide set for Portrait, Letter 8.5 inches wide by 11 inches high. Because we will be creating images for videos, we want the image ratio to be 16 wide by 9 high.

6.2 Create and Post Informational Videos

One of the most effective ways to promote your new social network is to create and post informational videos on one or more video channels - and then embed those videos on your social network website pages. There are huge numbers of people who spend their days watching online videos. These videos combine powerful visual images with audio – which can be a combination of music and spoken words. It is easy to embed your videos on your network website as well as place links to your videos in the comment sections of popular blogs. Here is an overview of this process:

01

Step 1 Create Slide Images with Libre Draw

In our previous article, 6.1, we explained how to create a series of images for our website Home Page Slideshow. The process is the same for creating images for a video presentation. Use the 12 wide by 6.75 Libre Draw Template for the Page Format. Then add images and text, then capture the images with Flameshot. Then precisely resize and crop the images with Gthumb.

Step 2 Create a Slide Presentation with Libre Impress
Also in article 6.1, we reviewed how to create a Libre Impress Slideshow with a ratio of 16 by 9 using a Slide Property of 10 inches wide by 5.62 inches high. We will use this same slideshow for our video presentation. But we will add a more interesting slide transition to go from slide to slide during our video. Open the Impress Presentation file:

6.3 Add a Free Email Newsletter

Sending email newsletters to folks on your website email list is one of the best ways to keep your community up to date on your latest events. The goal of every newsletter should be a call to action such as clicking on a READ MORE button that goes to a web page with more information. One option for sending newsletters is to use an email sending service like Mail Chimp. However, there are several drawbacks to using these third party services. Some are free initially but can cost a lot as the number of emails sent grows. Even if you can afford the cost, the real drawback is that you are giving your customers data to a third party service. It is much more secure to use a free Joomla email tool and send the emails directly from your own website.

In addition, third party services use shared IP addresses – meaning you may be sharing the same IP with a thousand other websites sending out newsletter – which can result in your emails going to spam folders. However, if you use a VPS with your own dedicated IP address, your emails are less likely to wind up in spam folders because your IP address is more likely to be considered “clean”.

We will therefore learn how to use a free Joomla newsletter tool called BwPostman. There is an instruction manual available for free download from this website. https://www.boldt-webservice.de/index.php/en/joomla-extensions/bwpostman.html

However, this manual is 90 pages long. We will therefore try to provide a shorter summary here.

Here is a summary of the features of BW Postman
#1 You can use either a normal Joomla article for your newsletter (so you can post the article on your website as well as sending it as a newsletter) or make a custom newsletter that is not a Joomla article.

#2 Newsletters can be personalized with the user’s name.

#3 You can create as many mailing lists or groups of email recipients or subscribers as you want.

#4 Newsletters are generated in both HTML and Text formats. This means you can create and use your own custom email HTML templates. In addition, BW Postman comes with default templates and a very easy template creation system.

#5 You can import or export subscribers from a CSV­ or XML ­file or any email address book. ­

#6 You can archive subscribers, newsletters, mailing lists, campaigns and templates and restore or copy them from the archive.

#7 You can include attachments with your emails.

#8 You can set how many emails will be sent at once.

#9 There is a fully functioning newsletter subscription module as well as a module for monthly overview of newsletters. All styles can be over ridden with custom CSS styles.

#10 Webmaster or another person may be informed per mail at each confirmation or un­subscription.

#11 Comes with free captcha tool to reduce subscriptions by robots with a simple math task or as user defined question, adjustable in settings. So there is no need to use a Google captcha (which would data mine your site and your members).

How to install and configure BW Postman

6.4 Add a Free Download Manager

We are living in a knowledge based economy. Word can spread quickly if you are offering important information for download on your website. One way to increase traffic to your website is to offer your visitors the ability to download informative documents. They can then read these documents when they are not online and even print them out to read when they are not on their computer. A download manager also gives you the ability to offer virtual products such as PDF slide shows and PDF tutorials to your readers. In this article, we will show you how to create a well organized Download Manager to help you display and track these download files.

Downloads can be offered on three kinds of pages – those open to the public, those open only to registered users and those pages only open to registered users who have paid a fee and joined a subscription based club. Even if you offer document downloads to your customers for free, you will still want to track how many times each document has been downloaded and where these special documents are on your website.

One of the best download managers is Phoca Download. It is very easy to set up and easy for customers to use because it has a nice appearance which can be customized for your website. It also has a batch uploader for adding several PDF documents at the same time. Here is a direct link to the Downloads page: https://www.phoca.cz/download/category/4-phoca-download-component

Click on the Joomla 4 version Download. Then install Phoca Download with your website Extension Manager.

01

Click Configure Phoca Download. This takes you to the Phoca Control Panel.

02

Create and Add PDF Icons
It is a good idea to include a PDF icon to let viewers know that they are downloading a PDF. You can get many free icons on the internet. You can use the following image to create your own PDF icons and place them in an icons folder on your Home computer. Just create a JPEG copy of this image and use the Gthumb image editor to create versions of it that are 50x50, 60x60 and 70x70:

03

Then go to your Media Manager and open the Phocadownload folder. Click Browse and find your Home computer icons folders and add these icons one by one to this special folder.

Create your downloads category folder structure on your home computer
If you have more than a couple of files that you want to allow viewers to download, you should create a category folder structure – similar to how we organized our Joomla articles into an articles category folder structure and how we organized our images into an images folder structure. This is done first by organizing all of your PDFs and other downloads into folders on your Home computer.