
By default, everyone can create conference rooms in Jitsi Meet. For security reasons, it is a good idea to configure your Jitsi Meet server to only allow registered users to create conference rooms. See this page for official instructions:
https://jitsi.github.io/handbook/docs/devops-guide/secure-domain/
The official instructions begin by configuring Prosody and then configure Jitsi Meet and Jicofo. Before we being, it is helpful to know that the Jitsi package files are organized into 6 groups with files in several places like this:
prosody
/etc/prosody/conf.avail/jitsi.example.org.cfg.lua
/etc/prosody (general configurations)
/etc/prosody/conf.d (configurations)
/usr/lib/jitsi-meet-prosody (lua plugins)
/usr/share/doc/jitsi-meet-prosody (example of configuration)
jitsi-meet
/etc/jitsi/meet/ jitsi.example.org-config.js (configurations)
/usr/share/jitsi-meet (html files)
/usr/share/doc/jitsi-meet (examples of configuration for nginx)
jicofo
/etc/jicofo (configurations)
/usr/lib/jicofo (binaries)
jitsi-videobridge
/etc/jitsi-videobridge (configurations)
/usr/lib/jitsi-videobridge (binaries)
nginx… /etc/nginx
Edit the Prosody configuration file
In this example, the domain example is 'jitsi.example.org'.
In this step, we will use the Midnight Commander to help us enable the authentication system for Jitsi. Once this system is set up, only moderators with the right authentication can start meetings with Jitsi. First, we need to enable the authentication on the Prosody service and define the guest domain. Start a root SSH session. Then type mc and Press Enter. Then click on the three dots in the upper right column to go to the root folder. Then click on the etc folder and navigate to the folder:
/etc/prosody/conf.avail/
Select the file jitsi.example.org.cfg.lua and click Edit to edit it with the Nano editor.
jitsi.example.org.cfg.lua
meet.peacenetwork.us.cfg.lua
Press Alt plus C to show line numbers. Then use the down arrow to scroll down to line 39 which reads:
VirtualHost "jitsi.example.org"
authentication = "jitsi-anonymous"
Note: Line 38 jitsi.example.org has been replaced with your hostname. Replace “jitsi-anonymous” with “internal_hashed”
For example:
VirtualHost "jitsi.example.org"
authentication = "internal_hashed"
Add Jitsi Internal Anonymous Domain to end of file
We don’t want attendees to enter username and password when joining the conference, so we need to create an anonymous login for guests, by adding the following lines at the end of this file. Note that you don’t need to create DNS A record for guest.meet.example.com.
At the end of the file, enter a couple of new lines and insert a new VirtualHost section. The name of this VirtualHost is guest.jitsi.example.org.
VirtualHost "guest.jitsi.example.org"
VirtualHost "guest.meet.peacenetwork.us"
authentication = "anonymous"
c2s_require_encryption = false
Save the file with CTRL O and Enter and exit the editor with CTRL X.
Step 16 Edit the Jitsi meet configuration file to add the Jitsi internal anonymous domain
This will allow guests to attend the video conference. Go to the /etc/jitsi/meet/ folder. Select the jitsi.example.org-config.js file and click File Edit to edit it. Press Alt plus C to show line numbers. Then use the down arrow to scroll down to line 36 which reads:
hosts: {
// XMPP domain.
domain: 'jitsi.example.org',
// When using authentication, domain for guest users.
// anonymousdomain: 'guest.example.com',
Delete the two forward slashes to Uncomment the anonymousdomain line and then change the line to use your jitsi instance:
anonymousdomain: 'guest.jitsi.example.org ',
anonymousdomain: 'guest.meet.peacenetwork.us',
Save the file and exit the editor.
Step 17 Configure Jicofo
Jicofo (Jitsi Conference Focus) is a component of Jitsi that manages user sessions. When running Jicofo, specify your main domain in an additional configuration property. Jicofo will then accept conference allocation requests only from the authenticated domain. This should go as a new 'authentication' section in /etc/jitsi/jicofo/jicofo.conf:
In this step, we will use the Midnight Commander to help us. In this example, the domain example is 'jitsi.example.org'. Start a root SSH session or go back to root with cd /. Then type mc and Press Enter. Then click on the three dots in the upper right column to go to the root folder. Then click on the etc folder and navigate to the folder: /etc/jitsi/jicofo/
Then select the file jicofo.conf and click File Edit.
Note that this is the file with the focus username and password.
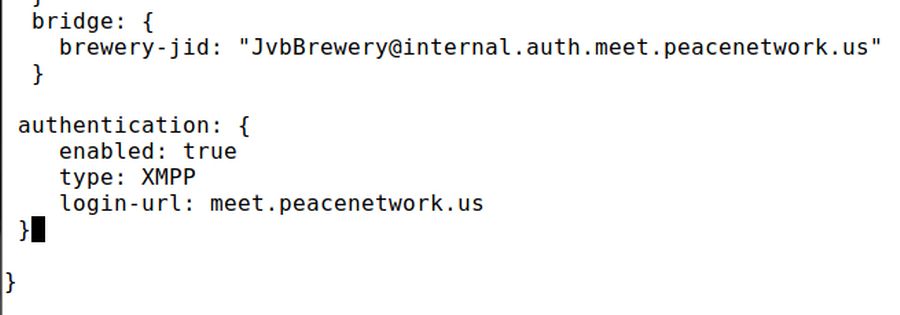
Place a new section called authentication inside of the existing jicofo section after the bridge brewery lines and before the final closing bracket.
authentication: {
enabled: true
type: XMPP
login-url: jitsi.example.com
}
authentication: {
enabled: true
type: XMPP
login-url: meet.peacenetwork.us
}
Here is what it will look like:
Save the file and exit the editor. Then type exit to exit and press Enter to exit Midnight Commander.
Step 18 Restart prosody, jicofo and jitsi-videobridge2
systemctl restart prosody
systemctl restart jicofo
systemctl restart jitsi-videobridge2
systemctl restart nginx
Step 19 Create new Jitsi moderators in Prosody (Internal authorization)
Last, we need to create one or more new moderators for our Jitsi Video Conference using the prosodyctl command ( which stands for "Prosody control"). Run the command prosodyctl register username fqdn password. Make sure to change the user, domain name, and password:
prosodyctl register <username> jitsi.example.com <password>
For example:
prosodyctl register johndoe jitsi.example.com SecretPassword123
Repeat this command for any additional users you want to create.
Now, only users with the correct username/password combinations can create new meetings on your Jitsi server.
prosodyctl register david meet.peacenetwork.us David1002
prosodyctl register elizabeth meet.peacenetwork.us Eliz0424
prosodyctl register peace meet.peacenetwork.us Peace1234
exit
meet.peacenetwork.us
Step 20: Test your new authentication system
https://meet.peacenetwork.us/restore-peace
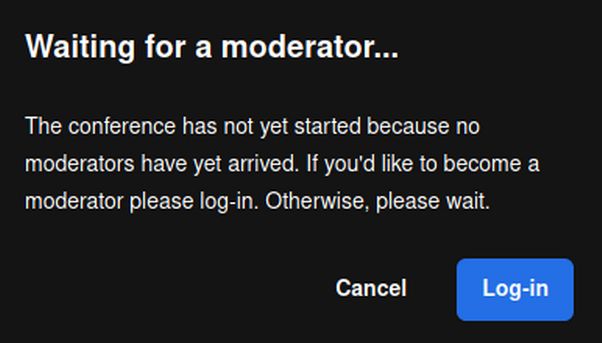
Click Log in:
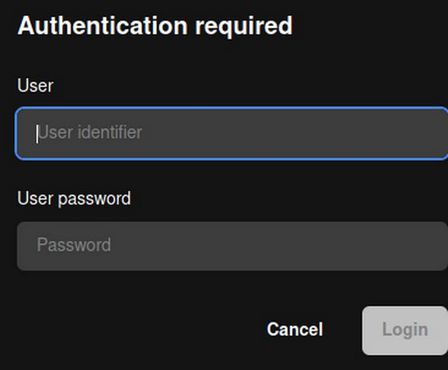
Click Login. It will open the video conference and confirm that you are the moderator. Now share this link with others to confirm that guest can attend without logging in.
Your Jitsi Meet instance is now configured so that only registered users can create conference rooms. After a conference room is created, anyone can join it without needing to be a registered user. All they will need is the unique conference room address and an optional password set by the room’s creator.
What’s Next?
In our next article, we will review how to customize the appearance of your video conference system.