2.1 Create a Secure Linux Computer

If you want to start a secure social network, you need at least one secure computer you can use to go online and make changes and additions to your network website and to hold your network data and documents. Sadly, all most people were taught to use when they went to school were Windows computers. Microsoft created an open back door to its operating system way back in 1998. Using a Windows computer can therefore leave your network data and website wide open to hacking. In this article, we will explain why and how to switch from a Windows computer to a secure Linux computer.

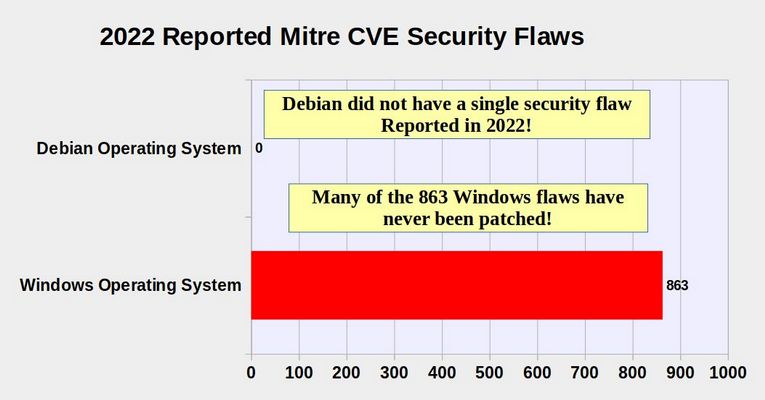
The most important reason to replace Windows with Linux BEFORE you build your network website is Windows Ransomware. Every Windows computer that goes online is subject to hacker attacks and Windows Ransomware. There is no way to protect a Windows computer. Every year, Ransomware attacks become more common – costing businesses billions of dollars. In 2022 alone, Windows computers suffered from 863 security flaws compared to ZERO security flaws for the Linux Debian operating system:

01

Why Linux Debian is the best choice for Windows Converts
Linux Debian is not owned by any corporation. Instead, it is a non-profit foundation controlled by a community of computer users who want to help develop and improve their own operating system.

If you eventually want to host your own websites on your own virtual private server, you will want to use Debian for that VPS and Debian for your Desktop or Laptop computer you will use to create your VPS and your online network website.

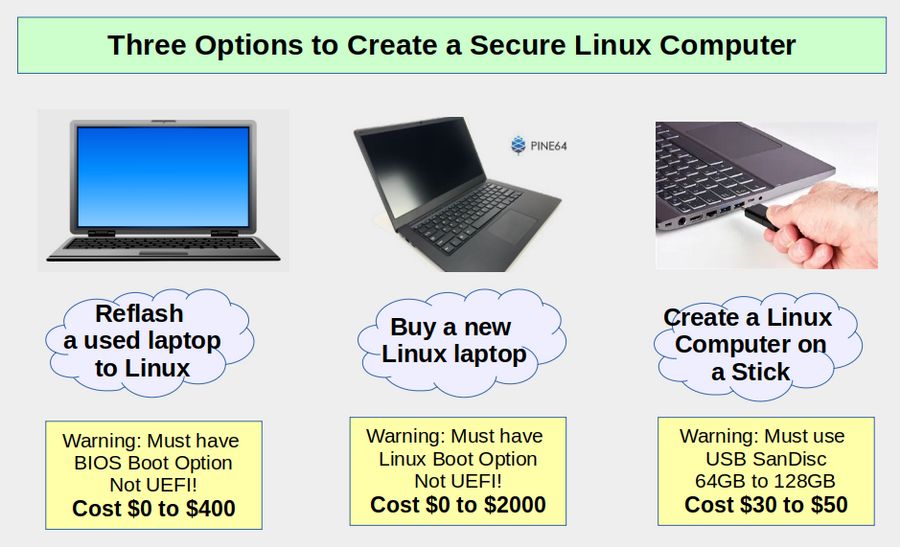
Three Options to Create a Secure Linux Computer
The first and most common option is to reflash an old Windows computer to turn it into a Linux computer. The second option is to buy a new Linux computer and the third option is to place Linux on a USB drive (also known as a computer on a stick) and insert the USB drive into a Windows computer after setting the computer to boot from a USB drive. This third option will not harm or change any documents, data or programs on your Windows computer.

02

Since Microsoft Windows 11 will not work with most current computers, many people will have an older computer that they can no longer use with Windows and which can be converted to Linux. We will therefore begin with a review of how to reflash a used computer to Linux and then discuss the other two options.

2.2 First Steps after reflashing to Linux Debian

In our last article, we reflashed our laptop and ended with the Linux Debian Start screen. In this article, we will review some important first steps to take after reflashing to Linux Debian. Here is the Debian Start screen:

01

Click on the Debian Menu in the lower left corner to bring up the Programs Launcher:

02

Here is a closer view of the Programs Launcher reached by clicking on the Debian Start button in the lower left corner of the screen:

03

Debian 12 now comes with the Debian Software Manager. It is the blue and white shopping bag near the top of the left column. How it got added to the Favorites column was by clicking on Administration, then click Software. Then right click and click “Add to Favorites.

2.3 Create Your Own VPS

In our previous two articles, we explained how to create and configure a Linux computer. In this article, we will summarize how to use your secure Linux computer to create your own secure Debian VPS and then install the Hestia Control Panel on it.

01

Why Canhost is the Best Option for Hosting your Social Network
I have written a detailed article explaining why I recommend Canhost to host your VPS. Here is a link to this article:

https://createasecurewebsite.com/first-steps/2-create-a-secure-vps/2-1-choose-a-secure-vps-host

In a nutshell, due to the Draconian Patriot Act, it is not secure to host your social network VPS on any server located in the US. It is also essential to use a VPS host with an easy graphical DNS Manager. Finally, it is important to use a VPS host that is not so small that they may go out of business but also not so large that they will have poor customer service. CanHost is located in Canada, has excellent customer service and uses an extremely easy DNS Manager.

Step 1: Use a Secure Linux Computer
Do not use a Windows or Apple computer as using either will compromise your CanHost account security.

Step 2 Use a Secure ProtonMail Email address
Do not use a Gmail address as it is not secure. You will be sent your initial password via email and it is therefore essential to use a secure Proton Mail email address. Also do not use a Windows computer to get your Proton Mail account as your Windows computer is simply not secure. Set up a Linux Laptop first. Then use your secure Linux laptop to get your secure Proton Mail account.

Step 3 Create an Account at Canhost
To register for an account, use your secure Linux computer to open a web browser. Then go to the Canhost Home page: https://www.canhost.ca/

Click Log In in the top menu. Then click Sign Up.

02

Use your secure Protonmail email address to create your CanHost account. Do not use Gmail or any other insecure email address. Also use a password that is at least 10 digits long with at least one capital letter, one lower case letter, one digit and one special character.

Step 4 Use your Canhost account to get a new domain name hosted by CanHost to use for your VPS name server
Alternately you can transfer a domain name to Canhost. However, because the domain name should be directed to CanHost servers, you will also need to transfer the files and database to CanHost if you want to use an existing domain name.

While you can use any domain name, such as mynetwork.com - or subdomain name, such as friends.mynetwork.com, it is not possible to change the domain name later. Therefore give some thought to this question.

In our example, we have obtained two primary domain names. The first is called Better Future Network dot com. The second is called Better Network dot us. Each domain name costs about $12 per year or $1 per month.

However, you could use the same domain name for all three by using the subdomain ns1.yourwebsite.com for your server, yourwebsite.com for your Joomla website and a different sub-domain, for example, friends.yourwebsite.com for your social network. This will allow us to later create a number of sub-domains such washington.betternetwork.us. In order to eventually set up a statewide or national network of Freedica websites to provide folks with an alternative to Facebook and Twitter.

2.4 Use Midnight Commander to Change VPS Settings

One of the biggest challenges of working with a virtual server is that it does not come with a desktop environment. Rather than clicking buttons, you need to enter commands in a terminal. The problem with the terminal is that, it can be very difficult for visual learners (who make up half the population) to be constantly entering a series of complex commands into an abstract tool like the terminal. Thankfully, the Linux community also provides a graphical user interface for a server File Manager called Midnight Commander. In this article, we will learn how to use Midnight Commander to change some important settings on our Debian VPS.

Install Midnight Commander
In a previous article, we installed Midnight Commander on our server with this command: sudo apt-get install mc

Once Midnight Commander is installed, you can open it by starting and SSH session and then type mc. Then press Enter. Here is the initial interface when opening Midnight Commander on a server:

01

On a server, you may need to navigate with the up and down arrows and select folders by pressing Enter on your keyboard. You can gain more function by using SSH to access the server from your home computer. Midnight Commander uses a double panel screen. The purpose of this double panel arrangement is to make it easy to copy files from one panel and paste them into the other panel. The panels are labeled Left and Right. Above the panels are a menu that applies to both panels with the menu items called File, Command and Options. Each menu item has a series of sub-menu items, some of which we will cover in this tutorial.